當你Solaris OS發生問題要怎麼辦
首先,你必須將系統的狀況回報給維護廠商
1. 執行 Explorer 程式:
# cd /opt/SUNWexplo/bin
# ./explorer
如果要針對Storage問題,執行指令如下
# ./explorer -w default,storage,fru
當程式執行完畢你會看到
explorer: Explorer finished 的訊息
2. 當程式執行完後,
# cd /opt/SUNWexplo/output
# ls
explorer.XX-2007.12.16.07.43.XXXX
explorer.XXXXXXXXX-2007.12.16.07.43.tar.gz
把 explorer*.tar.gz 寄出給維護廠商
Monday, December 17, 2007
Wednesday, December 05, 2007
Sybase's Login
Sometimes, we would like to know where a sybase's user come from? (e.g. IP)
1.) Find out the login's suid by using sp_displaylogin
1> sp_displaylogin person1
2> go
Suid: 2608
Loginame: person1
Fullname:
Default Database: mydb
Default Language:
Auto Login Script:
Configured Authorization:
Locked: NO
Date of Last Password Change: Nov 27 2007 11:03AM
Password expiration interval: 0
Password expired: NO
Minimum password length: 6
Maximum failed logins: 0
Current failed login attempts:
(return status = 0)
2.)Then select from sysprocesses by using the "suid"
1> select * from sysprocesses where suid=2608
2> go
spid kpid enginenum status suid hostname
program_name hostprocess cmd cpu physical_io
memusage blocked dbid uid gid
tran_name
time_blocked network_pktsz fid execlass
priority affinity id stmtnum
linenum origsuid block_xloid clientname
clienthostname clientapplname sys_id
ses_id loggedindatetime ipaddr
------ ----------- ----------- ------------ ----------- ----------
---------------- ----------- ---------------- ----------- -----------
----------- ------- ------ ----------- -----------
----------------------------------------------------------------
------------ ------------- ------ ------------------------------
---------- ------------------------------ ----------- -----------
----------- ----------- ----------- ------------------------------
------------------------------ ------------------------------ ------
----------- -------------------------- ---------------
53 163185511 0 recv sleep 2608 ssksdev1
AWAITING COMMAND 0 0
2 0 4 2609 0
NULL
NULL 512 0 EC2
MEDIUM ANYENGINE 0 1
1 NULL 0
0
0 Dec 5 2007 3:56PM 10.47.1.215
(1 rows affected)
3.) Now we know person1 is connected by using 10.47.1.215 machine =)
Friday, November 30, 2007
Thursday, November 08, 2007
Sybase Tuning
Engine
- no. of Engine
Cache
- create temp_cache, hot_cache, etc.
- cache size
- no. of cache partition (e.g. 2,4,8 but no bigger than no. of Engine)
- Large I/O pool (e.g. 2k,16K base on how many cache size?)
DB
- create tempdb, tempdb2, tempdb3, etc.
- sp_bindcache cache_name, dbname
Table / Object
- create index for table
- sp_bindcache cache_name, [,[owner.]tablename [, indexname | "text only" ] ]
Number of User connection
Number of open object
Friday, March 23, 2007
Sybase add user error
Error Message
Server Message: Number 17331, Severity 16
Server 'SYBASE', Procedure 'sp_adduser', Line 253:
User already has a login under a different name.
use the following sp
CREATE PROCEDURE drop_user_null_userdb
AS
DECLARE @username VARCHAR(25)
DECLARE GetOrphanUsers CURSOR
FOR
select Username = name
from userdb..sysusers
where suid not in(select suid from master..syslogins) and gid = 16390 and suid != -2
OPEN GetOrphanUsers
FETCH GetOrphanUsers
INTO @username
WHILE @@sqlstatus = 0
BEGIN
exec sp_dropuser @username
FETCH GetOrphanUsers
INTO @username
END
gid and suid need to change before exec
Thursday, March 22, 2007
solaris 5.8 / 10 notes 2
Remove Interface
1. Remove or rename the /etc/hostname.hme0 file
2. ifconfig hme0 down
3. ifconfig hme0 unplumb
4. Edit /etc/hosts and /etc/netmasks
5. boot
1. Create the /etc/hostname.hme0 file
2. ifconfig hme0 plumb
3. Edit your /etc/hosts and /etc/netmasks
4. boot
DHCP server:
# dhcpconfig (command prompt)
or
# dhcpmgr (GUI)
Disk Management
fdisk /dev/rdsk/c4t4d5s0 [rdsk/c4t4d6s0]
format>partition
newfs /dev/rdsk/c4t4d5s0 [rdsk/c4t4d6s0]
RAID 0 (concatenation)
metainit d4 3 1 c1t5d0s0 1 c4t4d5s0 1 c4t4d6s0
metainit d4 2 1 c4t4d5s0 1 c4t4d6s0
mount /dev/md/dsk/d4 /sportix4
growfs -M /sportix4 /dev/md/rdsk/d4
/dev/md/dsk/d4 /dev/md/rdsk/d4 /devdb ufs 2 yes -
RAID 1 (umountable file system)
metainit -f d18 1 1 c2t8d0s0
metainit d28 1 1 c2t13d0s0
metainit d8 -m d18
umount /sportix4
vi /etc/vfstab
/dev/md/dsk/d8 /dev/md/rdsk/d8 /sportix4 ufs 2 yes -
mount /sportix4
metattach d0 d2
Add a user with rights as root
change the UID to "0" as same as root from /etc/passwd
Logging for executed commands
Solaris作業系統可以通過設置日 誌檔可以對每個用戶的每一條命令進行紀錄,這一功能默認是不開放的,為了打開它,需要執行/usr/lib/acct目錄下的accton檔,格式如下 /usr/lib/acct/accton /var/adm/pacct,在sun的手冊上,只有這一種用法,但這樣做的缺點是明顯的,大多數有經驗的入侵者一定不會放過/var/adm和 /var/log這兩個目錄的,如果它們看到有pacct這個東西,不刪才怪。針對這種情況其實有個很好的解決辦法,執行 /usr/lib/acct/accton 後面跟一個別的目錄和檔即可,如/usr/lib/acct/accton /yiming/log/commandlog,這樣入侵者不會在/var/adm/下看到pacct,入侵者也許會刪掉message,syslog等 日誌,但他並不知道實際上他所有的操作都被記錄在案,管理員事後只要把commandlog這個檔拷貝到/var/adm下,改為pacct ,同時執行讀取命令lastcomm,就一切盡在掌握啦。如lastcomm hack,可得到下面的輸出結果:
sh S hack pts/7 0.05 secs Mon Jun 12 14:28
sh F hack pts/7 0.00 secs Mon Jun 12 14:39
ls hack pts/7 0.01 secs Mon Jun 12 14:39
ls hack pts/7 0.02 secs Mon Jun 12 14:39
ls hack pts/7 0.01 secs Mon Jun 12 14:38
df hack pts/7 0.03 secs Mon Jun 12 14:38
ftp hack pts/7 0.02 secs Mon Jun 12 14:37
ls hack pts/7 0.01 secs Mon Jun 12 14:37
vi hack pts/7 0.02 secs Mon Jun 12 14:37
who hack pts/7 0.02 secs Mon Jun 12 14:36
Monday, March 19, 2007
Sybase "sa" Passwords Recovery
1. kill the sybase server
2. edit $SYBASE/ASE-12_5/install/RUN_ file
3. add "-psa" :
#!/bin/sh
#
# ASE page size (KB): 2k # Master device path: /home/sybase/data/master.dat
# Error log path: /home/sybase/ASE-12_5/install/SUN1.log
# Configuration file path: /home/sybase/ASE-12_5/SUN1.cfg
# Directory for shared memory files: /home/sybase/ASE-12_5
# Adaptive Server name: SUN1
# /home/sybase/ASE-12_5/bin/dataserver \
-d/home/sybase/data/master.dat \
-e/home/sybase/ASE-12_5/install/SUN1.log \
-c/home/sybase/ASE-12_5/spxh2_train.cfg \
-M/home/sybase/ASE-12_5 -psa \
-sSUN1 \
4. start the sybase server
./startserver -f RUN_
for example:
.....
00:00000:00001:2001/05/26 18:29:21.39 server 'bin_iso_1' (ID = 50)
00:00000:00001:2001/05/26 18:29:21.39 server on top of default character set:
00:00000:00001:2001/05/26 18:29:21.39 server 'iso_1' (ID = 1).
00:00000:00001:2001/05/26 18:29:21.39 server Loaded default Unilib conversion handle.
New SSO password for sa:tmfyrkdwpibung <-- find this line
.....
5. login sybase: isql -S -Usa -P tmfyrkdwpibung
6. change sa password: sp_password tmfyrkdwpibung,newpasswd
7. shutdown sybase
8. fallback RUN_ file
9. start sybase again
OK now! =)
2. edit $SYBASE/ASE-12_5/install/RUN_ file
3. add "-psa" :
#!/bin/sh
#
# ASE page size (KB): 2k # Master device path: /home/sybase/data/master.dat
# Error log path: /home/sybase/ASE-12_5/install/SUN1.log
# Configuration file path: /home/sybase/ASE-12_5/SUN1.cfg
# Directory for shared memory files: /home/sybase/ASE-12_5
# Adaptive Server name: SUN1
# /home/sybase/ASE-12_5/bin/dataserver \
-d/home/sybase/data/master.dat \
-e/home/sybase/ASE-12_5/install/SUN1.log \
-c/home/sybase/ASE-12_5/spxh2_train.cfg \
-M/home/sybase/ASE-12_5 -psa \
-sSUN1 \
4. start the sybase server
./startserver -f RUN_
for example:
.....
00:00000:00001:2001/05/26 18:29:21.39 server 'bin_iso_1' (ID = 50)
00:00000:00001:2001/05/26 18:29:21.39 server on top of default character set:
00:00000:00001:2001/05/26 18:29:21.39 server 'iso_1' (ID = 1).
00:00000:00001:2001/05/26 18:29:21.39 server Loaded default Unilib conversion handle.
New SSO password for sa:tmfyrkdwpibung <-- find this line
.....
5. login sybase:
6. change sa password: sp_password tmfyrkdwpibung,newpasswd
7. shutdown sybase
8. fallback RUN_ file
9. start sybase again
OK now! =)
Thursday, February 22, 2007
MySQL 中文亂碼
先在 my.ini 中
建立一個 mysql connection 檔案
這裏是 for PHP only:
<?
//database connection details.
$host = "localhost";
$link = mysql_connect($host, "login_name", "login_pw");
mysql_query("SET NAMES 'utf8'");
mysql_select_db("table_name", $link);
?>
ref: d.Cat blog
[mysqld]
default-character-set=latin1
[client]
default-character-set=utf8
init_connect='SET NAMES utf8'
建立一個 mysql connection 檔案
這裏是 for PHP only:
<?
//database connection details.
$host = "localhost";
$link = mysql_connect($host, "login_name", "login_pw");
mysql_query("SET NAMES 'utf8'");
mysql_select_db("table_name", $link);
?>
ref: d.Cat blog
Tuesday, January 23, 2007
solaris 5.8 notes 1
Stop Power Management for Server (if turn it on before)
vi /etc/power.conf
autoshutdown 30 9:00 9:00 shutdown -- change to --> noshutdown
Network Configuration
use DHCP
1. touch /etc/hostname.<> (e.g. hostname.hme0)
2. touch /etc/dhcp.<> (e.g. dhcp.hme0)
use Fixed IP
1. touch /etc/hostname.<>(e.g. hostname.hme0)
2. echo "<> (e.g. sun1)" >> /etc/hostname.
3. vi /etc/hosts
127.0.0.1 localhost
# add a new line
loghost
e.g. 192.168.0.1 sun1 loghost
4. touch /etc/defaultrouter
5. echo "<>" >> /etc/defaultrouter
6. echo "<> (e.g. 192.168.0.0 255.255.255.0) " >> /etc/inet/netmasks
7. init 6
8. use ifconfig -a to check status
9. use ifconfigup/down to start/stop interface ( e.g ifconfig hme0 up )
Simple NFS Server Configuration
for example: wanna to share /testing with read & write permission
1. chmod 766 /testing
2. /usr/lib/nfs/nfsd -a (start nfsd service)
3. /usr/lib/nfs/mountd (start mountd service)
4. /etc/init.d/nfs.server start
5. share -F nfs -o rw /testing
6. showmount -a (check who are mounting from you)
NFS Client
for example: wanna to mount 192.168.0.1's /testing folder
1. mount 192.168.0.1:/testing /mnt
2. cd /mnt
vi /etc/power.conf
autoshutdown 30 9:00 9:00 shutdown -- change to --> noshutdown
Network Configuration
use DHCP
1. touch /etc/hostname.<>
2. touch /etc/dhcp.<>
use Fixed IP
1. touch /etc/hostname.<>(e.g. hostname.hme0)
2. echo "<>
3. vi /etc/hosts
127.0.0.1 localhost
# add a new line
e.g. 192.168.0.1 sun1 loghost
4. touch /etc/defaultrouter
5. echo "<>
6. echo "<>
7. init 6
8. use ifconfig -a to check status
9. use ifconfig
Simple NFS Server Configuration
for example: wanna to share /testing with read & write permission
1. chmod 766 /testing
2. /usr/lib/nfs/nfsd -a (start nfsd service)
3. /usr/lib/nfs/mountd (start mountd service)
4. /etc/init.d/nfs.server start
NFS Client
for example: wanna to mount 192.168.0.1's /testing folder
1. mount 192.168.0.1:/testing /mnt
2. cd /mnt
Friday, January 05, 2007
Windows 2003 NTP Client/Server Installation & Configuration
NTP Server:
1. Configure the following registry entries:
HKEY_LOCAL_MACHINE\SYSTEM\CurrentControlSet\Services\W32Time
Parameters\Type: NTP
Config\AnnounceFlags: 5
TimeProviders\NtpServer\Enabled: 1
Parameters\NtpServer: NoSync
2. Restart the service after changing these parameters from command prompt:
net stop w32time && net start w32time
NTP Client:
1. 3 utilities required:
instrsrv.exe
srvany.exe
Automachron (achron.exe)
2. Install achron.exe, start it from command prompt:
c:\program files\one guy coding\automachron\achron.exe /s
Config & Exit the Automachron
3. Put instrsrv.exe & srvany.exe files in a directory c:\reskit, open command prompt:
c:\reskit\instrsrv.exe Automachron c:\reskit\srvany.exe
4. Configure the following registry entries:
HKEY_LOCAL_MACHINE\SYSTEM\CurrentControlSet\Services\Automachron
From the Edit menu, click Add Key and name it Parameters.
Next from the Edit menu, click Add Value and type this information.
Value Name: Application
Data Type: REG_SZ
String: C:\Program Files\One Guy Coding\Automachron\achron.exe /s
5. Check Automachron’s LOG to ensure achron.exe run as a service successfully.
Tuesday, December 12, 2006
Solaris "root password" Recovery
今天從 http://solaris.tophk.net/forum/viewtopic.php?t=117 & http://wiki.gceclub.sun.com.cn/index.php/Opensolaris_chinese_faq 看到的 =)
較近的 solaris 10u1 & 11 (是用 grub 開機的):
1. start from "fail safe" mode
2. 系统會問你是否 mount "/" 分區到 /a 上,選 yes
3. 编辑 "/a/etc/shadow",delete "root" 的passwords,save & reboot
1.將安裝Solaris 10光碟片第一片放進來,並開機
2.選擇安裝方式,直接按【Enter】繼續
3.會開始拷貝系統安裝所需要的資料,大約等了5分鐘,會進入選擇語言畫面
4.利用滑鼠按下右鍵,選擇【Windows\New】,會出現一個新的視窗
5.輸入 mount /dev/dsk/c0d0s0 /mnt指令,會將根目錄Mount在mnt目錄下
6.輸入chmod 600 /mnt/etc/shadow
7.編輯/mnt/etc/shadow檔案,將root這一行的第二個密碼欄位Del掉,使其 保留空白
8.儲存結束,並重新開機,記得光碟片要拿起來,就不用輸入密碼,可以直接 登入
較近的 solaris 10u1 & 11 (是用 grub 開機的):
1. start from "fail safe" mode
2. 系统會問你是否 mount "/" 分區到 /a 上,選 yes
3. 编辑 "/a/etc/shadow",delete "root" 的passwords,save & reboot
Solaris 9 & 10 (不是用 grub 開機的):
1. 用 disk 1 boot 機
[X86]: BIOS set cdrom boot 機
[Sparc]:press "Stop+a" (SUN keyboard) or "ctrl+break" (PC keyboard) 進入到OBP & enter:
ok boot cdrom -s
2. 然后,mount "/" 分區,edit "shadow":
mount /dev/dsk/c0t0d0s0 /mnt (assume 你 harddisk 上的 "/" 區是 "/dev/dsk/c0t0d0s0"
vi /mnt/etc/shadow
1.將安裝Solaris 10光碟片第一片放進來,並開機
2.選擇安裝方式,直接按【Enter】繼續
3.會開始拷貝系統安裝所需要的資料,大約等了5分鐘,會進入選擇語言畫面
4.利用滑鼠按下右鍵,選擇【Windows\New】,會出現一個新的視窗
5.輸入 mount /dev/dsk/c0d0s0 /mnt指令,會將根目錄Mount在mnt目錄下
6.輸入chmod 600 /mnt/etc/shadow
7.編輯/mnt/etc/shadow檔案,將root這一行的第二個密碼欄位Del掉,使其 保留空白
8.儲存結束,並重新開機,記得光碟片要拿起來,就不用輸入密碼,可以直接 登入
Monday, December 11, 2006
wireless network diagram 記錄
 一個 wireless 的 network diagram
Tuesday, December 05, 2006
越過 ISA & Websense 的msn blocking
 很多人都有用過 web 版的 msn 吧! 但 websense 是可以把它輕易的 block 掉。但 www.e-messenger.net 就會可以成功連線 msn,因為它應該是用回 80 port 出街的。
Friday, November 17, 2006
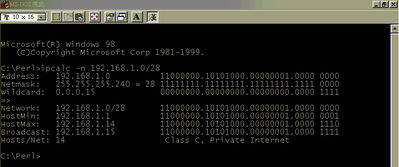
ipcalc on windows
linux 有個好好用的計 ip 工具 -- ipcalc
想在 windows 用都可以的, here is:
1. download ipcalc.pl from http://jodies.de/ipcalc
2. download activeperl from http://www.activeperl.com
3. install activeperl just click "Next" and "Finish" XD
4. move the ipcalc.pl file to c:\perl
5. open the command prompt
6. cd c:\perl
7. pl2bat ipcalc.pl
8. thats it!
想在 windows 用都可以的, here is:
1. download ipcalc.pl from http://jodies.de/ipcalc
2. download activeperl from http://www.activeperl.com
3. install activeperl just click "Next" and "Finish" XD
4. move the ipcalc.pl file to c:\perl
5. open the command prompt
6. cd c:\perl
7. pl2bat ipcalc.pl
8. thats it!

Wednesday, October 18, 2006
好用的network monitor tool
偉大的祖國真係有好多不太出名, 但非常強勁的軟件同人材 XD
Colasoft Capsa 6.2 一隻比 ethereal 介面更美觀和易用的網絡監察工具, 為一可惜是只有簡體版 (在XP用是沒問題的, 只要你識睇簡體)
個人免費試用下載 http://www.colasoft.com.cn/download/capsatech.exe
它有好多圖像化顯示, 可以好清晰咁了解到實時的網絡traffic =) 覺得好用就買商業版吧
p.s. 有點像賣廣告 anyway 請支持 "made in china"
Colasoft Capsa 6.2 一隻比 ethereal 介面更美觀和易用的網絡監察工具, 為一可惜是只有簡體版 (在XP用是沒問題的, 只要你識睇簡體)
個人免費試用下載 http://www.colasoft.com.cn/download/capsatech.exe
它有好多圖像化顯示, 可以好清晰咁了解到實時的網絡traffic =) 覺得好用就買商業版吧
p.s. 有點像賣廣告 anyway 請支持 "made in china"
Wednesday, October 11, 2006
Windows XP auto-reboot problem
試過好多次遇到 Windows XP 不停 reboot 的問題, 無論正常或 safe mode 都一樣! 一向的解決方法都是 re-install (不影响 data) Window 和 所有的 program, 實在浪費時間...
今日無意中在網上發現到一個類似的 case 和解決方法 =) 有機會就 check 下 work 唔 work???
方法大槪是要令到一個叫 "cnsminkp.sys" 的 file 不會在開機時就 run, 咁就 ok 了 =)
solutions:
1. find and delete cnsminkp.sys (default path 是 C:\Windows\System32\cnsminkp.sys)
如果有裝2個以上的 OS, 就好簡單啦 (當然要 read 到 WinXP 的安裝目錄);
如果得一個 OS 咁就入去 "恢復控制台" 啦
2. Disable CnsMin
同樣可以入去 "恢復控制台", 輸入 " Disable CnsMin" 的 command
Sunday, September 03, 2006
Saturday, July 15, 2006
BIOS有密碼點算???
當你整機時發現個 BIOS 有 set 到密碼,你是否又諗住拆機 clear CMOS 呢???
GREAT NEWS! 這個網頁提供了一些 BIOS 制造商的 BLACKDOOR 密碼 How to Bypass BIOS Passwords
GREAT NEWS! 這個網頁提供了一些 BIOS 制造商的 BLACKDOOR 密碼 How to Bypass BIOS Passwords
e.g.
Award BIOS backdoor passwords:
Award BIOS backdoor passwords:
| ALFAROME | BIOSTAR | KDD | ZAAADA | |||
| ALLy | CONCAT | Lkwpeter | ZBAAACA | |||
| aLLy | CONDO | LKWPETER | ZJAAADC | |||
| aLLY | Condo | PINT | 01322222 | |||
| ALLY | d8on | pint | 589589 | |||
| aPAf | djonet | SER | 589721 | |||
| _award | HLT | SKY_FOX | 595595 | |||
| AWARD_SW | J64 | SYXZ | 598598 | |||
| AWARD?SW | J256 | syxz | ||||
| AWARD SW | J262 | shift + syxz | ||||
| AWARD PW | j332 | TTPTHA | ||||
| AWKWARD | j322 | |||||
| awkward |
AMI BIOS Backdoor Passwords:
| AMI | BIOS | PASSWORD | HEWITT RAND | |||
| AMI?SW | AMI_SW | LKWPETER | CONDO |
Wednesday, June 28, 2006
免費下載多種 language 的 ebook
網主收集了多種 programming language 的 ebook 供各位下載 =) good
http://www.computer-books.us/
http://www.computer-books.us/
Thursday, June 22, 2006
FreeBSD r6.1 安裝 notes (1)
因我用 winxp boot 機,所以先把 freebsd cd1 中的 boot/boot1 copy 到 C:\fbsdboot\boot1
修改 boot.ini︰加入 C:\fbsdboot\boot1="freebsd 6.1"
(p.s. 跟著這裏教的 =D)
用 disk genius 清空一個 10G partition,把 freebsd 安裝下去!直接用 auto 分了區 (比較 lazy 嘛,加上我肯定 freebsd 的 FDisk 比 RH Linux 的差 XD), 再 set 好一堆必要的東東....
因我只有 cd1,所以連 cvsup 都要上 ftp 取來裝。終於都安裝完 freebsd.....一個超簡陋的 x-windows 模式。
真正的 post-install 才開始 (救命!)︰
# cp /usr/share/examples/cvsup/ports-supfile /usr/local/etc (有點多餘的 =P)
# cvsup -h cvsup2.freebsd.org /usr/local/etc/ports-supfile.....超耐 =(
安裝 icewm (windows manager)、firefox、openoffice、icewmcp等....又花去了一段時間設定
總算有個似像的 OS (一點 server 功能都沒有 XD)
Subscribe to:
Posts (Atom)